How to set up the SAPL Server CE
What is the SAPL Server CE
The SAPL Server CE is a component designed to provide centralized policy evaluation and enforcement for systems implementing Attribute-Based Access Control (ABAC). It serves as a dedicated server responsible for evaluating access control policies defined in the Streaming Attribute Policy Language (SAPL) and making authorization decisions based on incoming requests.
Therefore the SAPL Server CE is a lightweight Policy Decision Point (PDP) that uses the SAPL and provides authorization services through an HTTP and RSocket API.
The SAPL Server CE uses a database for PDP settings and SAPL documents. Via WebUI the administrator is allowed for runtime updating of policies that are reflected in decisions made for ongoing authorization subscriptions.
Key features of the SAPL Server include:
-
Policy Evaluation: The SAPL Server evaluates access control policies expressed in SAPL dynamically at runtime. This allows for real-time decision-making based on the attributes of the user, resource, and environment.
-
Centralized, WebUI-based Management: It provides a centralized platform for managing and deploying access control policies by storing all data in a database. Policies can be updated and modified centrally, ensuring consistency and manageability.
-
Scalability: The SAPL Server CE is designed to handle high volumes of authorization requests efficiently. It can scale horizontally to accommodate growing workloads and support large-scale deployments.
-
Integration: The SAPL Server CE integrates with various application frameworks and platforms, acting as a policy decision point (PDP) in the authorization architecture.
-
Security: SAPL Server CE is a software product that follows secure information technology practices and multiple layers of defense based on Secure By Design Principles (also see CISA Secure By Design).
This tutorial provides a comprehensive guide to setting up the SAPL Server CE. The tutorial walks through the process of installing, configuring, and deploying the SAPL Server CE. By following this tutorial, users will gain a deep understanding of how to effectively set up the SAPL Server CE to manage access control policies in their environment.
Secure by Design
SAPL Server CE is a software product that follows secure information technology practices and multiple layers of defense based on Secure By Design Principles (also see CISA Secure By Design).
It is a tool for users to implement Secure by Design systems by incorporating attribute-based access control (ABAC) into their own products and environments.
SAPL adheres to the secure by default principle. SAPL Server CE comes with a basic example configuration that includes the essential security controls to ensure compliance with Germany’s Federal Office for Information Security (BSI) BSI Baseline Protection Compendium Edition 2022.
Application security is a top priority in the development of SAPL. The SAPL project also embraces radical transparency and accountability. Security issues are reported and shared using the GitHub advisory feature. For more details, see the SAPL Security Policy.
System requirements
For running the application from source or building the application you will need to clone the github repository and meet the following requirements:
- Operating system that is compatible with java
- Java Development Kit 17 or a newer version
- Maven 3.9 or a newer version
Database
The SAPL Server CE requires a database. You can choose to use either H2 or MariaDB. If opting for an H2 database, it can be created later using the setup wizard or by running a properly configured setup.
If using a MariaDB, the url, username and password must be known for successful configuration.
Set up SAPL Server CE for production
Table of contents
We will now proceed to examine the following steps to configure the SAPL Server CE for a production setup
- Prerequisites
- TLS Encryption/Certificate
- Database
- Download and Building SAPL Server CE
- Download
- Build the SAPL Server CE Locally
- Running from Source
- Set up Application Configuration
- Using the setup wizard
- Going through each step of the setup wizard
- Finishing the setup wizard
Prerequisites
TLS Encryption/Certificate
For production, it is highly recommended to use TLS which requires a keystore. If one is not available, it can be created with a tool like XCA for example. If you need to create a self signed certificate, you might have a look a the tutorials at the XCA homepage.
After creating a certificate in XCA, please export is as PKCS#12 certificate and store it as .pfx or .p12 file.
For our tutorial we will name this file keystore.p12. The file must be placed in a location where the server CE can access it.
Note: By running the SAPL Server CE from source, maybe the keystore file sapl-server/sapl-server-ce/config/keystore.p12 will be used. This file is an example and should not be used for production!
Database
As mentioned earlier, the SAPL Server CE requires a database to store the PDP settings and SAPL documents. For this purpose, an H2 database or a MariaDB can be used.
If an H2 database is configured, either the file path to an existing database file can be specified, or if the database file does not exist, it will be created upon the first start of the server.
If a MariaDB is used, a database with the collation latin1_swedish_ci must be created before proceeding.
Download and building SAPL Server CE
Download
The source of the policy engine is found on the public GitHub repository: https://github.com/heutelbeck/sapl-server.
You can either download the source as a ZIP file and unzip the archive, or clone the repository using git:
git clone https://github.com/heutelbeck/sapl-server.git
Build the SAPL Server CE locally
To build the server application navigate to the sapl-server/sapl-server-ce folder and execute the following command:
mvn install -Pproduction
After completing the build process, you can run the SAPL Server CE locally by navigating to the target folder and run the jar-file, e.g. by executing the following command:
java -jar sapl-server-ce-3.0.0-SNAPSHOT.jar
Running from Source
To run the SAPL Server CE from source navigate to sapl-server/sapl-server-ce folder and execute the following command:
mvn -Pproduction
Set up application configuration
The SAPL Server is a Spring Boot application. Many aspects of its configuration can be controlled through properties in the application.yml file or by using Spring’s Externalized Configuration.
If using a local application.yml, this file should be placed in the directory working-dir/config.
An example application.yml is also provided in the repository at sapl-server/sapl-server-ce/config/application.yml. Users familiar with Spring can freely modify and use this application.yml as needed. Alternatively, the setup wizard can be utilized to generate an appropriate application.yml file.
The keystore.p12 file could also be placed in the ./config folder.
In the repository and bundled within the JAR file, there is a minimal configuration just allowing the server to start and bring up the setup wizard, but it cannot be deployed into production. This minimal configuration lacks critical operational parameters such as parameters about the keystore for TLS encryption, admin credentials, API authentication, database configuration, and so forth. These parameters must be configured before deployment.
Note: By running the SAPL Server CE from source, maybe the configuration file sapl-server/sapl-server-ce/config/application.yml will be used. This file is an example and should not be used for production!
Using the setup wizard
WARNING: Using the setup wizard with a not encrypted connection means that someone could potentially intercept the entered parameters such as usernames and passwords. It is recommended to run the wizard locally and later transfer the generated application.yml file to the target system via a secure connection. Alternatively you could set the TLS parameters for the application in the application.yml and then set up everything else with the setup wizard
Start up the setup wizard
To start the setup wizard you basically just start the SAPL Server CE as mentioned before by running it from source using maven or by running the jar file. If the application can’t retrieve values for the datasource url/path or the admin username for the WebUI from the configuration at the application.yml the setup wizard will start up.
The necessary parameters for the datasource and the admin username are:
spring.datasource.url
and:
io.sapl.server.accesscontrol.admin-username
So, if either of the two parameters is not configured or if no application.yml is found at all, the setup wizard will appear on the web interface. For this tutorial, we will use the JAR file built above and place it on our server. Next to it, we will create the folder config and put our keystore.p12 there. Now, we start the application with
java -jar sapl-server-ce-3.0.0-SNAPSHOT.jar
Since the application.yml is completely missing on the server, the setup wizard’s web interface can be accessed by visiting the following URL in a browser on the server:
http://localhost:8080/
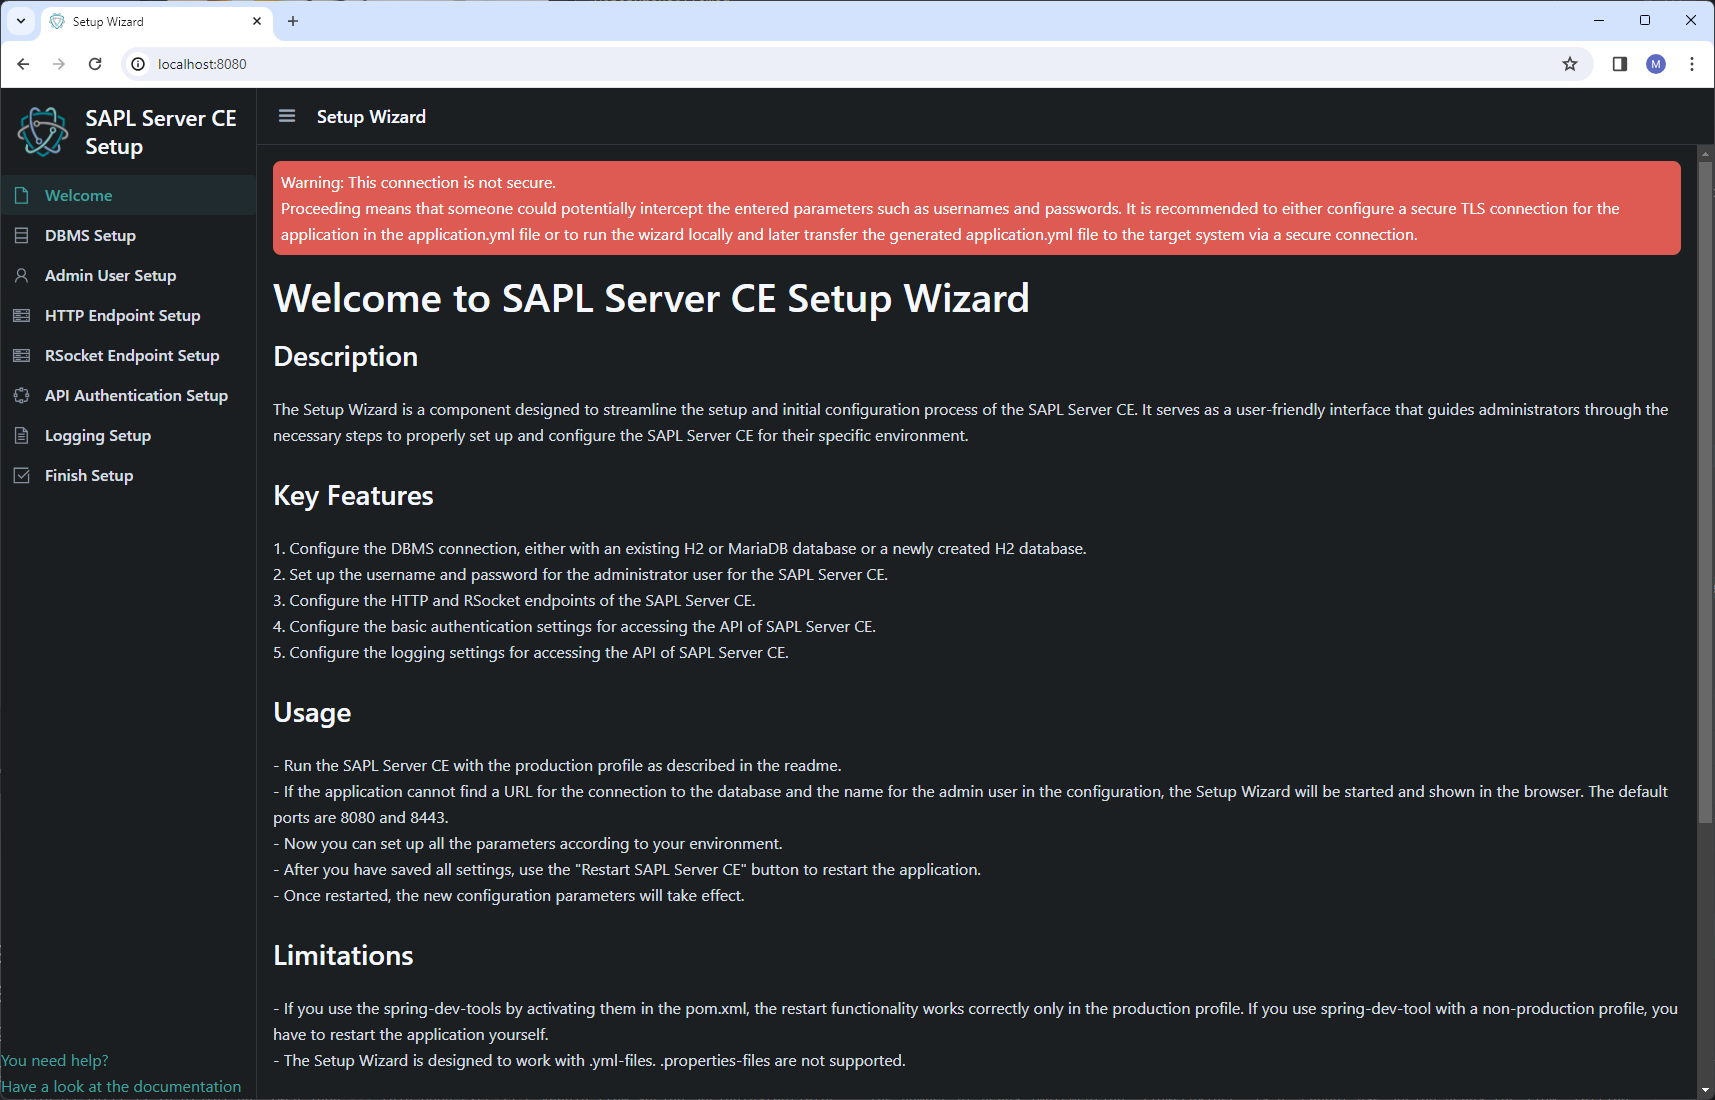
Welcome to the setup wizard
When accessing the setup wizard, users are greeted with the welcome page, providing fundamental information and guidance on options, limitations, and usage. Navigation through the individual steps is implemented by the menu on the left side. Each step must be saved for confirmation, even if no changes are made to the configuration.
If application.yml files with some of the configurable parameters are provided, these values will be applied in the setup wizard.
By saving each step, the configuration will be written to the application.ymlfiles. Because we don’t have an application.ymlat all in our example, a new one will be created in the folder ./config relative to our jar file.
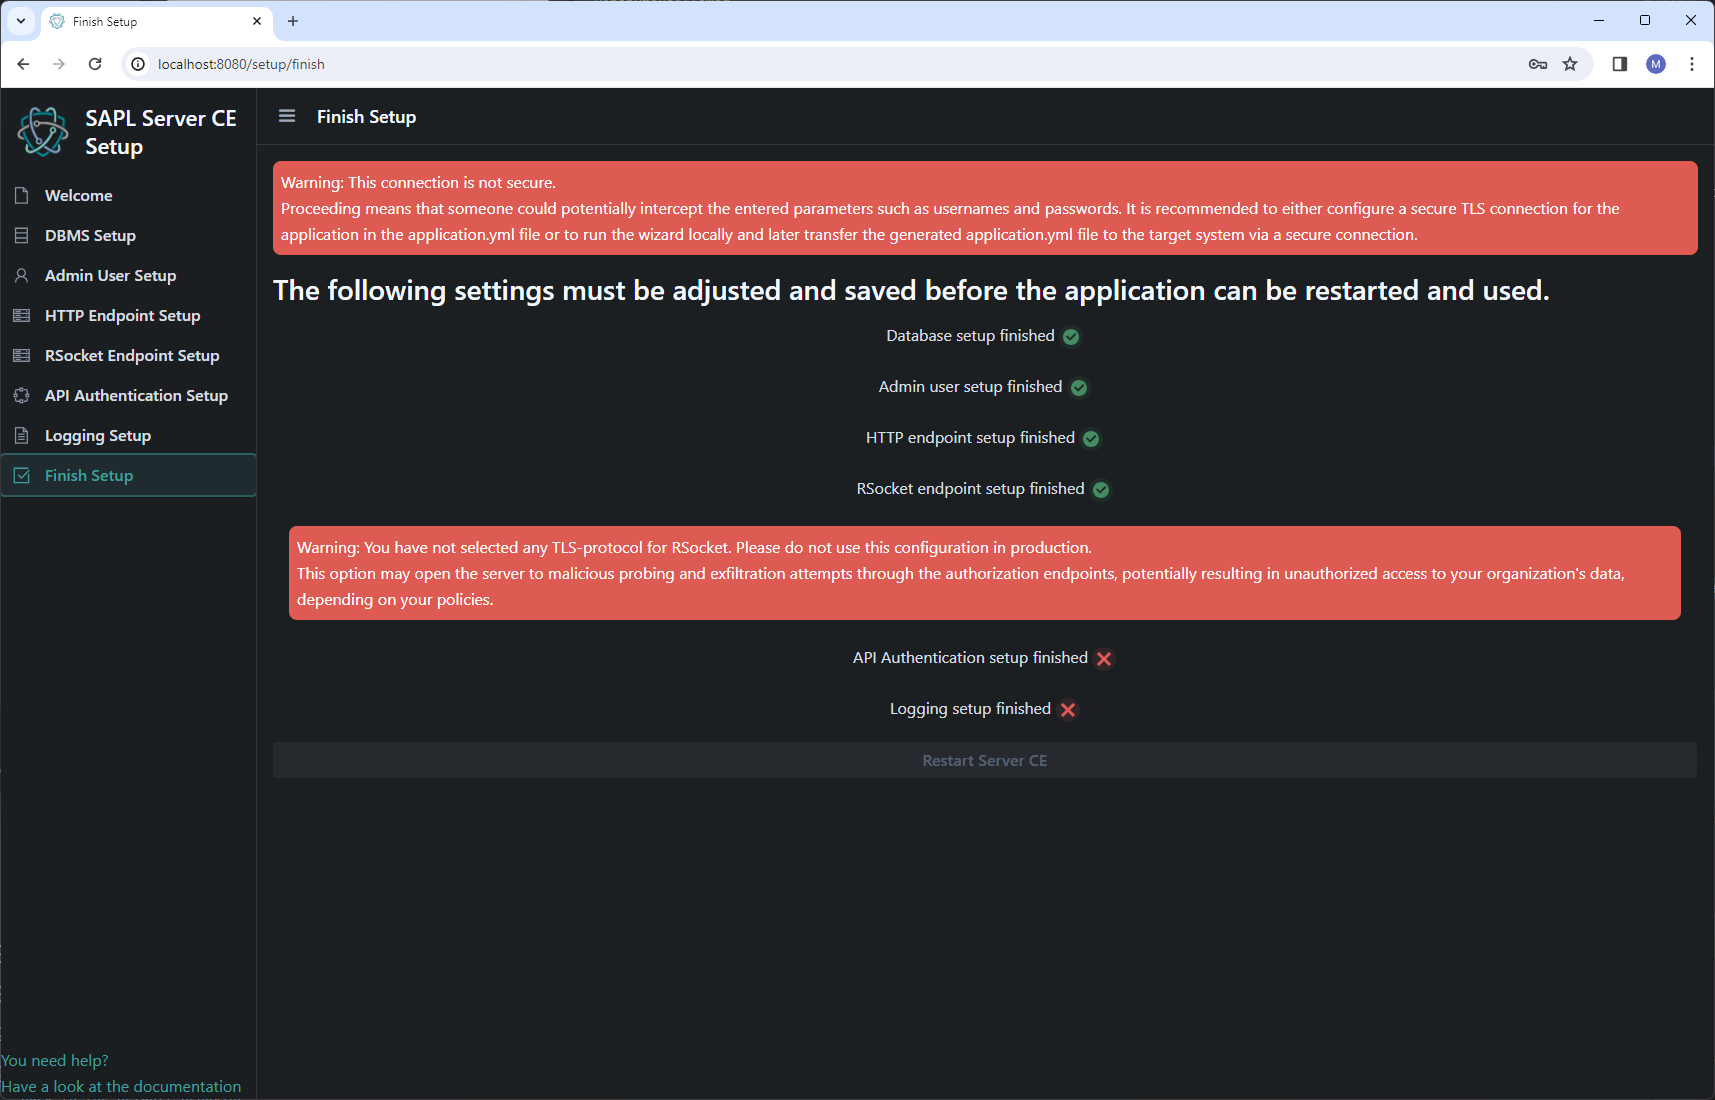
On the finish page, an overview of completed and pending steps is presented. Once all steps are completed, the application can be restarted from there, applying the new configuration.
Datasource configuration
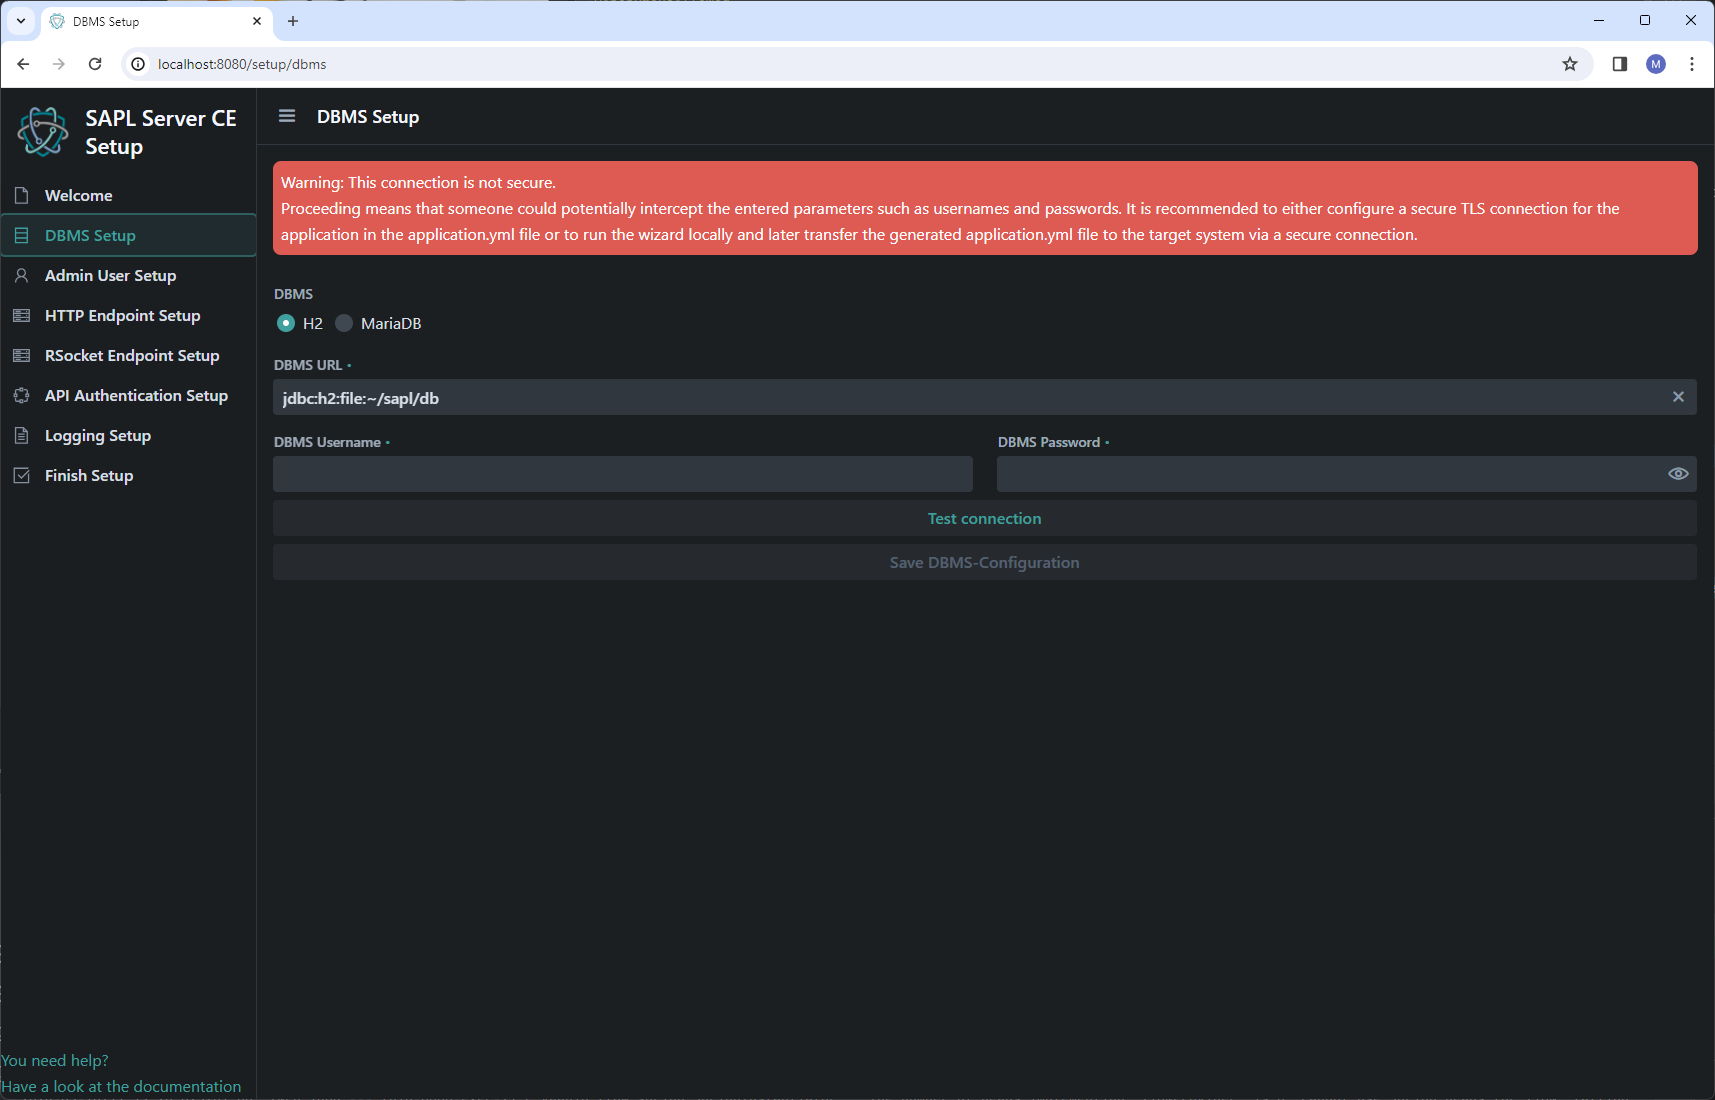
In the first step, the database connection can be configured and tested. Here, the type of database is selected at first, followed by providing the JDBC URL. Additionally, credentials must be provided if required.
For an H2 database, the path to the database file can be specified absolutely or relative to the application. The tilde (~) symbol refers to the users home directory. During the connection test, an attempt is made to connect to an existing database. If the database file does not exist, you will be asked if you would like to create it.
After the successful test or creation of the database, the configuration must be saved.
Admin user configuration
On this page, the credentials for accessing the WebUI are set. A username and password must be provided. Password strength indicators are displayed, although they are not mandatory.
WARNING: For production, please make sure to use strong passwords!
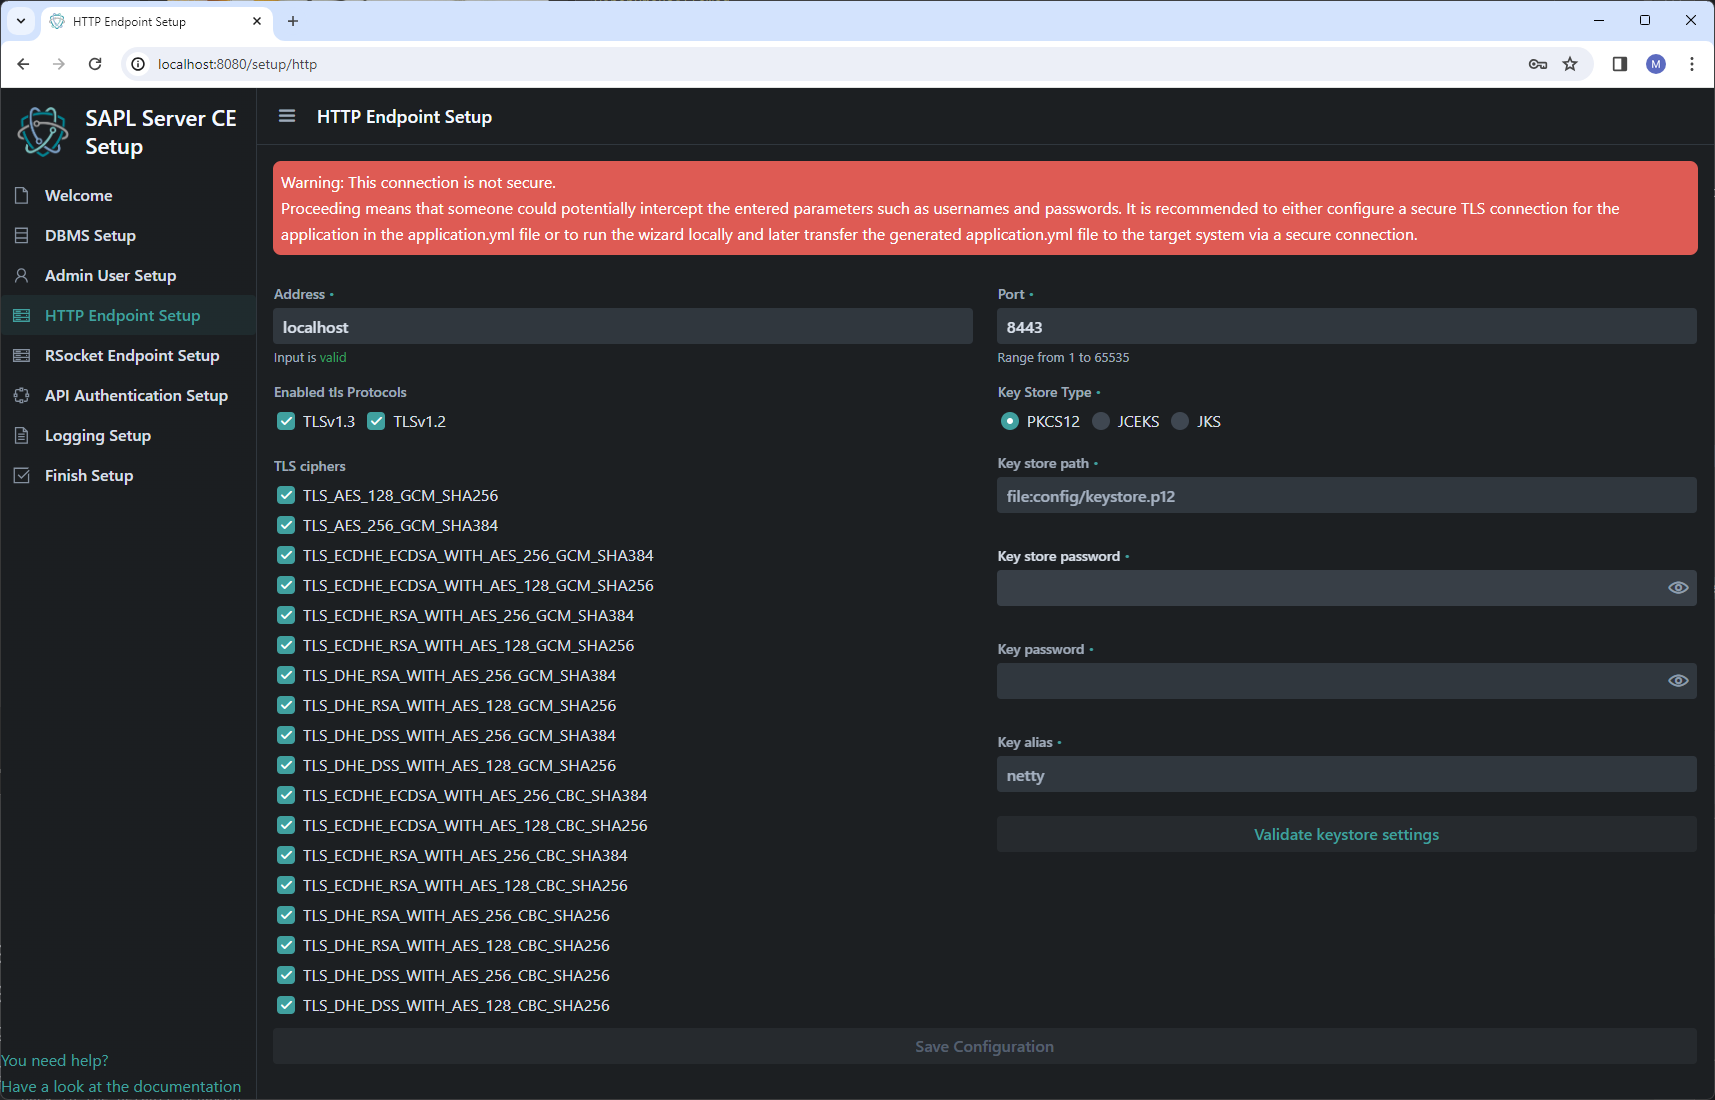
HTTP and RSocket endpoint configuration
On the HTTP endpoint page, the networking properties for both the Web UI and the HTTP API endpoint are defined. On the RSocket endpoint page, the networking properties for the RSocket API endpoint are specified. It is strongly recommended to use TLS encryption for production!
For the endpoints, you can set the address and port. The address determines under which address or network interface the SAPL Server CE is reachable on the server. When choosing the port, consider whether TLS is used or not. For example, port 8443 is only available when TLS is enabled.
Once one of the two possible TLS versions is activated, various cipher suites are available for selection. The offered TLS versions and cipher suites are based on Germany’s Federal Office for Information Security’s (BSI) BSI Baseline Protection Compendium Edition 2022.
If a configuration is needed, which uses outdated or insecure deviating from the offered versions and cipher suites, the configuration must be done manually by directly editing the application.yml file.
Note: The available cipher suites depend on the client and server implementation, i.e. not all configured cipher suites are available for every client. Nevertheless, more cipher suites can be configured, as the client and server automatically negotiate which cipher suites are available.
Once TLS is enabled, the previously created certificate keystore is required. The keystore file must be accessible to the application. For example, it can be placed relative to the application in the ./configfolder.
To ensure that the keystore is available and the inputs are correct, the keystore configuration has to be validated.
Only then is it possible to save the configuration.
API Authentication configuration
On the API Authentication page, you can configure which authentication methods should be enabled for API access. For Basic Auth and API Key Auth, the corresponding credentials will be generated later in the WebUI. For API Key Auth, caching can also be activated and configured. As a third option, OAuth2 can be enabled, and the associated OAuth2 server can be specified.
Logging configuration
In the logging settings, various options are provided to configure logging in more or less detail. Corresponding descriptions for each logging level are available. At this point, a sensible preselection is made, too.

Finishing the setup wizard
As mentioned earlier on the finish page, an overview of the individual steps is provided. Additionally, there are indications of whether the configuration is completed and saved, as well as which points still need to be addressed. Warning messages are also provided if TLS is not enabled.
Once all steps have been saved, you have the option to restart the application. Upon restarting, there is an automatic redirection to the page configured in the HTTP setup. After the restart, the page may need to be reloaded in the browser manually. At this point, the login page should be visible, allowing you to log in with the previously configured admin credentials.
Conclusions
The setup process outlined in the article covers essential requirements, including system prerequisites, database configuration, and TLS encryption setup. Utilizing a setup wizard ensures a user-friendly experience, guiding administrators through crucial steps such as datasource configuration, admin user setup, and endpoint configuration. By adhering to best practices and utilizing recommended security measures, users can confidently deploy SAPL Server CE to effectively manage access control policies in production environments.
You can achieve much more with SAPL, including deploying flexible distributed organization-wide authorization infrastructures.
Feel free to engage with the developers and community on our Discord Server.